
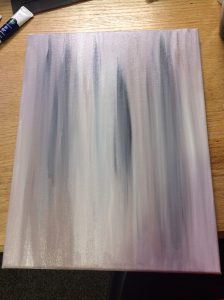
This week on my painting journey I tried a kind of painting that I’ve never tried before and honestly, did not think I would like it! However, this is by far my favourite painting. The background is my favourite part.

To begin, I got my inspiration after asking a Facebook group where I should learn to paint. You can read about that in this blog post. Someone suggested Paint with Jane. I found her on YouTube (and Twitter) and found a painting that I liked. Something that I really appreciate about Jane’s channel is her organization. She has her videos in playlists and the playlists are labeled “beginner paintings”, “Christmas paintings”, Halloween paintings”, etc. I have found that this organization makes it very easy as a beginner to find paintings that are not too difficult.
This is the tutorial that I followed here:
Something that I appreciated was that in the Painting with Jane video’s description box was a list of the paintbrushes that Jane uses (the size/shape). Also listed was the colours and the brand of colours that she used. I think what helped contribute to my success painting was the fact that I had the correct paintbrushes and the correct colours (except one). Although I have a different brand, the names of the colours were the same. I did not have the colour “Cadmium Yellow Deep Hue”, however I ran out of white paint, so had to go to Michaels. I wrote down the name (and brand) of the paint that she used, and compared it to the brand that I have when I was at Michaels! Thankfully there was a very close match!
Jane’s tutorial was very easy to follow. The angle of the camera was correct and the lighting was very good to see what she was doing. Further, she often held up her “palette” (I think its actually a paper plate!) so I was able to see what exactly she was doing when mixing colours and getting colour on her brush. When she said “get a lot of yellow on your brush”, a lot can be interpreted in many ways, however because she showed herself putting it on the brush, I was able to see what she meant by a lot.
Something that I learned, which shocked me, was to use a blowdryer to speed up the  amount of time it takes to dry a painting. When Jane said, now grab your blowdryer and begin drying, I thought that I did not hear her right. I think I had this face and said, wait, what, when she said grab your hairdryer. Sure enough, after some research, yes, you do use a blowdryer to help speed up the drying time. This painting took a lot of layers, and many times drying had to happen before I was able to move on so was able to speed up the process using a blowdryer.
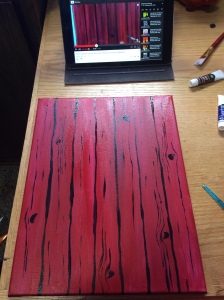
 When I was doing this painting, I learned a new technique. To make a distressed fence look, you actually paint a combination of white, umber, and black underneath the red colour. This way the dark spots show through in the red paint. As I was doing this, I was unsure of how it was going to turn out, but the fence is one of my favourite elements on this painting!
Overall, I am very happy with this painting. It is by far by favourite painting that I have done! Stay tuned for more paintings!

Christina,
Your painting looks beautiful! This is such an interesting technique that I never would have thought to use! Thanks for sharing! 🙂
Shayla
LikeLike
Thanks Shayla, I had never thought about this technique either. It seemed to work quite well! I may do more Painting with Jane videos because she seems to have new and interesting techniques!
LikeLike
I also have done this! My friend and I get quite creative when we paint because we are too impatient or simply don’t have the resources. So for example instead of using palette knives we used old credit cards to paint thin lines (lol) and instead of this stippling brush Bob Ross used (we watch Ross tutorials as we like to paint landscapes), I scrunched up paper towel and dipped it and poked it gently on. It gave sharp random blots that helped make my clouds. Also my friend taught me that, for covering large areas a solid colour, just dip your paper towel in acrylic paint and spread acrosd the canvas. It absorbed less paint and went way faster than a brush. That, and no more stray brush hairs!
Happy painting Christina!!
LikeLike
Hey Taylor, I love your ideas- they seem very resourceful which is good when you’re on a student budget! 🙂 I’ve found that sometimes I will skip certain tutorials if they use tools that I don’t have. Your ideas are helpful! Thanks for commenting!!
LikeLike
Hey there, you are an awesome painter. I liked your ideas you use during your work. They are creative and resourceful. Keep up with the good work.
LikeLike
Pingback: FINGER PAINTING!! | Christina Thiel
Pingback: My Acrylic Painting Journey | Christina Thiel